How It’s Done –
Metallic Epoxy Flooring

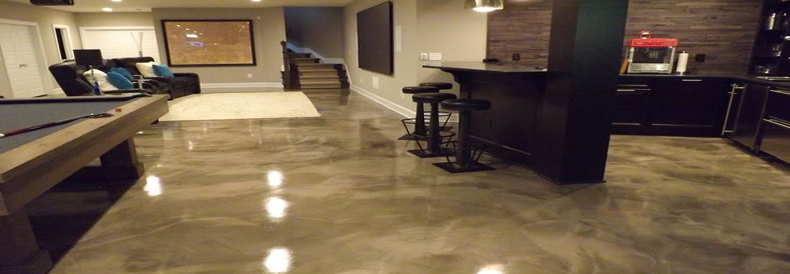
Metallic epoxy flooring is one of the premier flooring options for garages, basements, industrial, and commercial properties. Its low maintenance durability make it the top choice in flooring and the custom design options can fit any design niche and budget. Installing metallic epoxy floors can be simple when you know what you’re doing and is best left to trained professionals. Here are the basic stops of metallic epoxy flooring application.
- It all begins with proper preparation. The true beginning and the lion’s share of the labor is in the first step, which is really the precursor to any application steps. The surface must be smoothed, imperfections or divots must be repaired, if desired, and the surface must be completely free of all dirt, dust, debris, and any other chemical or substance that may be on your subfloor. With a concrete subfloor, grinding the surface with a large grit sander is also advisable.
- Once the subfloor is properly prepared it is time to begin the application process. The first application is a specialized primer. Often a solid colored primer is recommended to hide any leftover floor imperfections. Although, imperfections can add to the design aesthetic, this is the time to hide or remove them if they are not desired. At this point the primer should be allowed to dry properly in order to cure the surface for the next application
- After the primer has cured, the floor is now ready for the application of the metallic floor coating. The metallic color and design choice must be mixed with the coating using a drill and paddle mixer to properly mix the materials prior to application. When you apply the coating, you simply pour the mixture onto the surface in a long fairly even trail and then spread the mixture around the surface of the concrete. This is where the design really comes to life. There is no right or wrong way to do this, but any swirling or patterns that you add now will be a part of your permanent design. Spread the material evenly using a large squeegee and a lint free nap roller.
- Approximately 15 minutes later, walk the floor with specially designed spiked shoes and use a leaf blower to remove all detailed roller marks left on the floor in order to generate that unique attractive finish that is signature to metallic epoxy flooring.
- Technically once this process dries and cures, your metallic epoxy floors are complete, but a top coat is also recommended to extend the life of your floors even further. Not only does a top coat add durability, but it can also add shine as well as other slip resistant texture to increase the safety of your beautiful new floors.
Following these steps help professionals to give you the complete metallic epoxy floor look that you desire for your home or business. Experts make sure that the job is done appropriately and that the end result is your desired design without the hassle and headache of self installation.
